Build Automator uses MSBuild to compile projects and solutions no matter if they are in Visual Studio or in Clarion.  By default, MSBuild is a single thread program, but there is a way to tell it to start multiple processes to compile.

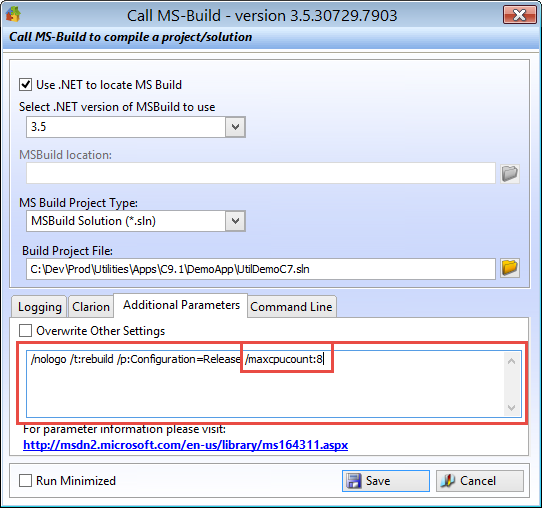
After some experiments on a virtual machine, I'd say it's definitely worth it to try it out and see if it helps.  What you need is the /maxcpucount parameter which you can add to the "Additional Parameters" tab on the "Call MS-Build" action in Build Automator.

Compile with MSBuild

The benefit may not be as much as you had hoped for, but it definitely does improve performance.  Here are some numbers.  This was tested on a Windows 10, 64bit virtual machine in VMWare 12.5.  It is set up with 5.7GB of RAM.  In the first test it was set to use 1 CPU and 2 cores.

15:42:59.898
15:45:54.809 00:02:54.911  without /maxcpucount
15:33:22.832
15:36:04.000 00:02:41.168 with /maxcpucount:2
15:52:48.811
15:55:21.083 00:02:32.272  with /maxcpucount:8

In this test, I was able to shave off about 38 seconds with the 8 CPU setting.  Your milage may certainly wary as this may be different outside of virtualized environment and it may be different depending on what CPU you have and a lot of other configurations.  No errors were reported and everything seemed to compile correctly.

All generated files were destroyed before each test and ClarionCL.exe was used to generate.  The Clarion IDE was not involved at all in this process and was closed while the testing was performed.  Only command line utilities.

Bottom line is if you are compiling larger solutions with Build Automator, then you should check out the /maxcpucount parameter.  For more information about this parameter, please see the information on the MSDN Website

Yesterday I was messing around in the IDE and noticed the ASCII table in the Toolbox pad and realized it was missing the Extended ASCII characters (ASCII 128-255)  This morning I got an email from ClarionHub, which hosts a repository on Github with some goodies - including an updated ASCII table with updates from Mark Goldberg.  I played around with it and have now added all the Extended characters to the table and committed it back to Github.  I have also made it available for download here on Icetips at http://www.icetips.com/files/ASCIITable.xml

Once you have saved the file, you need to go to the folder where Clarion is installed and then navigate to "data\options\TextLib" and you will find ASCIITable.xml there.  Make a backup copy of it and then copy the file from Icetips over it.  Restart the IDE and you should now get the full extended ASCII table.

There are two more files in the repository on Github, "CW File Access Modes.xml" and "CWErrors.xml"  The first one contains all the values for file access modes and the second one contains a list of run-time errors you may encounter and what they mean - see screenshot below:

Clarion10ToolboxWithCWErrors


So, check those files out - they may be helpful to you:)

Arnor Baldvinsson

In the new IDE you can align controls using the snap lines; the thin blue lines that pop up when you drag controls around in the window designer. You see it appear in the screenshot below between the "Property" radio button and the drop down control, indicating that they are being align by the bottom edge of the controls.

Clarion 10 Snap lines and distance lines

You can also see two short lines above the drop down, which indicate optimal vertical space between the drop down control and the two radio buttons above.  The distance lines appear for both horizontal and vertical spacing.

The snap lines also appear when you are re-sizing controls which can be both good and bad.  It's good when you need to size multiple controls to be the same width or height, but it gets in the way if you just want to re-size a control, like for example the "Me and related users" radio button which originally extended outside of the group control, overlapping the border of the group.

You can re-size a control by holding down the shift key and then using the left/right, up/down arrow keys.  But you can also re-size them by using the mouse and without the snap lines getting in the way.  Simply hold down the Alt key on the keyboard and re-size or move the control with the mouse.  It will now ignore the snap lines and you can re-size and re-position at will.  Release the Alt key and the snap lines immediately appear and the control snaps into place.

Snap lines also work with multiple controls selected.

Clarion 10 Snap lines on multiple controls

I use the snap lines a lot when lining things up and also the distance lines to set the distance from one control to another.  To the best of my knowledge they are not customizable in the IDE's Options, which would be desired so the distance can be changed.

Clarion 10 Window Designer Grid Options

You also have the option to use grids.  In my (limited) experience with grids in other environments, they tend to be coarse and not very helpful.  But this is a matter of choice and taste so please try them out to see how they work and if you like them or not.

There is no option to turn both grids and snap lines off.  Either one is always turned on.  However, with the grids you can turn off the "Snap to Grid" effectively disabling it and if you uncheck "Show grid" then it will not show up either so with that you have turned both grid and snap lines off.  It would have made sense to have a "None" radio button there for the Align Mode, but with the ability to select Grid and then effectively turning it off, it serves the same purpose.

Arnor Baldvinsson

I have been working on Build Automator in Clarion 10 this week, along with other things.  Yesterday I discovered that there was something very odd going on with the resizing of the windows.  When comparing the Search and Replace window between the Clarion 6.3 version and the Clarion 10 version, it was like the listbox wasn't stretching like it should, as seen in the screenshot below.

06.17.2015-14.59
Clarion 6.3 window on the left, Clarion 10 window on the right.

After quite a bit of snooping around and posting on the newsgroup, where Bob Campbell pointed out the listbox size issue, I came to the conclusion that there was a problem with the WindowResizeClass.SetParentDefault method in ABRESIZE.CLW.  So to test it, I copied the one from Clarion 6.3 and omitted the original and lo and behold the resizing worked perfectly again!

After sleeping on it, I realized that the code change involved a new method of finding the parent control of a control, which doesn't have a PROP:Parent parent - kind of an orphan;)

In the class method the code figures out what type of parent controls there can be:

 CASE ThisControl{PROP:Type} + 0
 OF CREATE:Group
 OROF CREATE:Option
 OROF CREATE:Tab
 OROF CREATE:Sheet

This is missing both CREATE:Panel and CREATE:Region!  I'm using Panels all over the place on the windows in Build Automator and came to the conclusion that this is where the problem was.  So I added:

 OROF CREATE:Panel
 OROF CREATE:Region

to the list, re-compiled after omitting the Clarion 6.3 code, and it worked perfectly again:) The CASE statement is around line 580 in the ABRESIZE.CLW file if you want to do this fix to your class file.  I have reported this to Softvelocity and hope they will fix this in the next release.

Arnor Baldvinsson

In the Applications pad there is an option in the generate/build buttons drop down list to "Generate Trace File"  Today I was wondering what this was and my first thought was that this was the template debug trace file.  But on my development virtual machine I couldn't find one even though I had found that this setting was checked.

So I asked on the Clarion 10 newsgroup and Graham Dawson set me straight on this.  This is indeed settings for the template debug trace file.

Clarion10TraceFiles
Trace File Options in the Applications pad in Clarion 10

There are 3 options there:  generate, don't generate and generate by application settings.  If "Generate Trace File" is turned on, it is generated unconditionally.  If "Don't Generate Trace File" is checked, then it's not generated.  If "Generate Trace File - Default (Application Settings)" is on, then it's only generated if it's set in the Application Options.

Clarion10ApplicationOptionsTraceFiles


So what is this Trace File?  It is a file that generates all interactions with templates during generation.  It can grow to enormous size!  For example generating an application with browses and update forms, about 100 procedures, produced a file that was 3.5 GB (yes GB as in GIGA Bytes!) after a single generation!

Obviously those huge files are next to useless for template debugging because of their size and that's where the #DEBUG statement comes in.  The trace file generation can be turned on or off by using #DEBUG(1) to turn it on and #DEBUG(0) to turn it off.  But it's not quite that simple as the value must by in a symbol so you have to do something like this:

#DECLARE(%SetDebug)
#SET(%SetDebug,1)
#DEBUG(%SetDebug)
  #! Some template code here
#SET(%SetDebug,0)
#DEBUG(%SetDebug)

This would then generate just the code in between the #DEBUG statements into the trace file.

The default Trace File name in the Application Options is "C:\tpldebug.txt" and if you force the Trace File generation with the generation/build buttons, it is "C:\tpldebug2.txt"  If you change the filename in the Application Options to just be the filename, without the driveletter, i.e. "tpldebug.txt" the file is generated into the folder where the application is that you are generating.

If you feel that the generation is slower than normal, check to make sure this isn't turned on!  Even on a very fast computer generating the trace file to a SSD drive, it still slows down the generation considerably!

Arnor Baldvinsson

I do quite a bit of small hand coded test projects. Usually just a few lines of code to test some code or concept.  One of the things I like to do is add the Icetips Utilities to those projects so I can use methods like ODS (OutputDebugString)

Below I go through the steps and at the bottom is a short video of the whole process (1 minute, 31 seconds)

To create a small project like that you need to create a project using the "Win32 EXE" option when you create the solution.

CreateNewSolution
Creating a new source solution in Clarion 10

I also always uncheck the "Auto create project subdir" as I have normally create the folder before I create the solution, but if you haven't check this and it will create a sub folder with the name of the project.

The next step is to change the project settings.  In the Solution Explorer right click on the project node and select "Properties" from the popup menu.

Clarion10OpenProjectProperties
Opening the Project Properties in Clarion 10

In the project properties, select the "Compiling" tab and in the "Conditional Compilation Symbols" enter:

_ABCDllMode_=>0;_ABCLinkMode_=>1;_ITUtilDllMode_=>0;_ITUtilLinkMode_=>1
Clarion10SetProjectProperties
Setting Conditional Compile Symbols in Clarion 10

This will compile both the ABC classes and the Icetips Utility classes.  Note that this setting is for an EXE.  If you are compiling a DLL, then you need to switch the 0 and 1 in the settings above.

The first thing you need to do is to include the main header file:

  INCLUDE('ITUtilityClass.inc'),ONCE

I do this above the MAP statement.

Now you can use any code from the Icetips Utilities in your project.  For example:

ITU ITUtilityClass
 CODE
 MESSAGE('Icetips Utilities: ' & ITU.EXEName)

In the video below (no sound) go through each of the steps to make this happen:

I hope this may help some of you to use the power of the Icetips Utilities in your source projects 🙂

Arnor Baldvinsson

In Clarion 9.1 and 10 you can change the fonts for the IDE. This makes it easy to customize the IDE to look the way you want it to.  Personally I change the environment fonts to Segoe UI 9pt for dialogs and listboxes and Segoe UI 17pt for the Start page.

Clarion10FontSettings

I use good, old, boring Courier New 10pt for the editor but you might want to try Consolas, Lucinda Console or some other fonts.  Somehow I have ended up with one of Adobe's font on my laptop, "Source Code Pro" which comes in several different versions (black, semi-bold, light, extra-light)  The normal one looks pretty good, but I haven't really used it.  I have also used Droid Sans Mono which is a Google font.  If you want to find fonts to use in your editor, something other than Courier New, then go to fontsquirrel and have a look around.

Note that you must restart the IDE for the font changes to show.  This applies to all the font settings, also the Text Editor settings, which is a bit of a bother as you have to restart the IDE just to see how the fonts look like.  My suggestion is to load some code into WordPad and use it to pick a font that looks good to you and start from there.  WordPad has a nice feature where it will automatically reformat the text when you hover over a font in the font selection drop-down so it's easy to see how the font will affect the code.  See the video below for a demonstration.

Hope this will help you set up your environment to your liking:)

Update:  Here is an article, while from 2010, contains a nice collection of monospaced programming fonts:
http://www.codeproject.com/Articles/30040/Font-Survey-of-the-Best-Monospaced-Programming

Arnor Baldvinsson

It was brought to my attention today by Lee White that the manifest for Clarion 10 is set to "asInvoker" This means that the IDE is NOT elevated when it runs. This can cause problems.

2015-06-10_1239

For example if you are used to seeing the  "Process Running" message if you accidentally left the program running that you are compiling, you will not see that in Clarion 10.  It will simply give you an "Access denied" error at the end of the linking process.

To fix this you need to make a small edit in the Clarion.exe.manifest file in your Clarion\Bin folder.  If you load it into an editor you will see a line that looks like this:

<requestedExecutionLevel level="asInvoker" uiAccess="false"/>

Change this line to:

<requestedExecutionLevel level="requireAdministrator" uiAccess="false"/>

save it and you are done.  Now the IDE will open elevated and the "Process Running" warning will once again work as it should.  Note that to get the warning you must turn off the "Kill running process before build" or Clarion will simply kill it without prompting.

2015-06-10_1244


I have been running the Clarion IDE as elevated since Clarion 7 came out and never had issues with it.  But apparently some people have had problems so Softvelocity decided to change the manifest in Clarion 10.

Arnor Baldvinsson

Sometime in the next few days our server will be moved from one virtual server to another with more RAM and more disk space and SSD, so it should make the website even faster:)  I don't know the schedule for this yet, but I'm hoping it will be today or tomorrow (Thursday May 21st or Friday May 22nd)  I don't think there will be any disruption by this move, maybe a downtime of a few minutes while the host company switches things around, but please be patient if the site goes down!

We have had occasional problems with the email server crashing because of low memory and that should be a thing of the past:)  I do not think we have ever lost any emails due to these crashes.  I'm planning to get our other websites over to this server in the very near future.

About 6 weeks ago I manged to fall down the stairs - yes that took real talent! - and almost break my right ankle.  I have had to be very careful about keeping my foot up and ice it, which is rather cumbersome when sitting at a desk!  It's much better now, but there is still swelling and I have to be careful when walking.  So things have moved very slow on everything lately and I apologize for how quiet it has been!

Clarion 10 is just around the corner and all our installs have been ready for some time except the CheckboxFixer which by accident didn't show the Clarion 10 option when installing.  There is a new build on the website with that fix.

Arnor Baldvinsson

We have been asked a few times if we could make a zip with all the installs available. Now we have, and with the help of Build Automator, it is now a "one button" process that I can run as I upload new builds 🙂  The install files are in a password protected zip file that you can download.  Note that you must have a Gold subscription and be logged in to be able to download.  I have not made a separate download for the silver subscriptions.  The current zip file from April 14, 2015 is 96,198,707 bytes in size and contains all 14 product installs that we currently have.

I have finally been able to move Build Automator up from Clarion 6.3.  I was not able to compile it in Clarion 9.1 because of a "unknown compiler error" that would come up in one of the classes.  However, Clarion 10 was able to compile it just fine.  I've had to make some minor changes here and there - the splitting on the main window is now using a different splitter template than originally, but so far I haven't seen any problems with it.

I'm planning to get the new build of Build Automator out in April - unfortunately it just didn't make it in March!  I'm not going to say anything about other plans as that's an absolutely sure way to mess them up! 🙂

Arnor Baldvinsson