I do quite a bit of small hand coded test projects. Usually just a few lines of code to test some code or concept. One of the things I like to do is add the Icetips Utilities to those projects so I can use methods like ODS (OutputDebugString)
Below I go through the steps and at the bottom is a short video of the whole process (1 minute, 31 seconds)
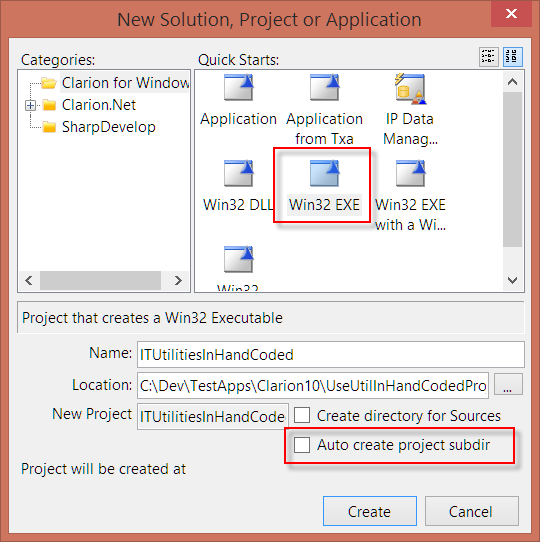
To create a small project like that you need to create a project using the "Win32 EXE" option when you create the solution.
Creating a new source solution in Clarion 10
I also always uncheck the "Auto create project subdir" as I have normally create the folder before I create the solution, but if you haven't check this and it will create a sub folder with the name of the project.
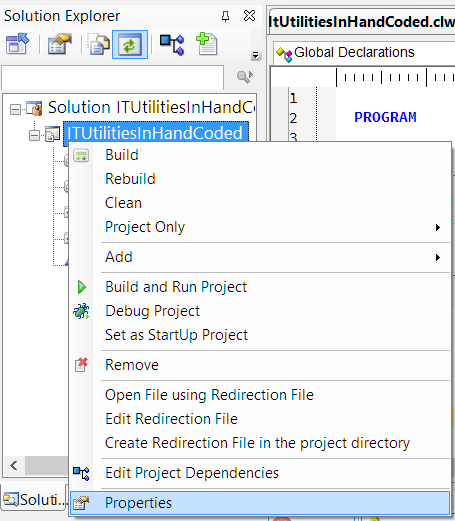
The next step is to change the project settings. In the Solution Explorer right click on the project node and select "Properties" from the popup menu.
Opening the Project Properties in Clarion 10
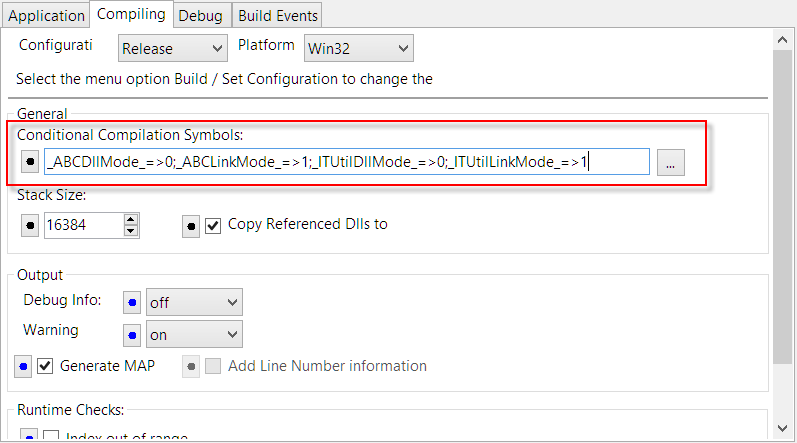
In the project properties, select the "Compiling" tab and in the "Conditional Compilation Symbols" enter:
This will compile both the ABC classes and the Icetips Utility classes. Note that this setting is for an EXE. If you are compiling a DLL, then you need to switch the 0 and 1 in the settings above.
The first thing you need to do is to include the main header file:
INCLUDE('ITUtilityClass.inc'),ONCE
I do this above the MAP statement.
Now you can use any code from the Icetips Utilities in your project. For example:
ITU ITUtilityClass
 CODE
 MESSAGE('Icetips Utilities: ' & ITU.EXEName)
In the video below (no sound) go through each of the steps to make this happen:
I hope this may help some of you to use the power of the Icetips Utilities in your source projects 🙂
I was staring at a completely unfamiliar window in a client project and had no idea what procedure it came from. It was a form, so I didn't know what the original caption was and the strings on the window were pretty generic. I needed a way to figure out what procedure this was. Instead of spending time doing searches I decided to chance tactics and use the WindowsInitCode procedure from the Icetips Utilities to do it for me. I explain the process in my latest Icetip.
What I did was to create a control on the window with the procedure name, as well as put it in the window caption and send it to DebugView with OutputDebugString (ODS method available in all Icetips classes)
Every now and then I do a "File | Save as" in C6 to clean out the gunk that Clarion collects in the apps from time to time. Been working on a fairly large app with a lot of browses and forms in it and today after adding a browse/form to it and doing some work the IDE crashed. Been working in this VM for probably 2 weeks or more without rebooting it (and Clarion 6.3 has been running that whole time) and decided it was time to do this trick again. The app file went from 7.8MB to 5.8MB! Now it loads much faster and generates faster also:) I don't know if this still applies in C7/C8 but wouldn't be surprised if it did. If you are not doing this regularly or semi-regularly to apps that you are working on a lot, your apps are collecting gunk that does nothing but slow Clarion - and you - down! It's simple:
1. Open your app
2. Use "File | Save As" to save it to a new name (I use appnameX.app)
3. CLOSE the app. This is an important step I have found.
4. Move the original app (appname.app) out of the folder for
backup IN CASE something fails (it has never failed for me, but you never know!)
5. Open the appnameX.app
6. Use "File | Save As" to save it back to the original name.
7. Keep going:)
I try to do this like once a month or so, depending on how much I work in the apps. After I posted this I received word from one guy who did this to his app and it went from 15MB to 1MB!!!)
My client reported a problem when attempting to run our project that was a bit baffling:
"The procedure entry point _18ProtectedHashTable__ct__@FiP15CriticalSection could not be located in the dynamic link library c60runx.dll"
Since all that we are sending back and forth are the applications and no binary files there was no way that we were mixing any binaries up, besides we are using the exact same builds of Clarion 6.3 - 9059 so this shouldn't be a problem at all.
After asking around I found out that the reason for this is that Clarion 7 includes a Clarion 6 compiled version of Topscan, which is not compiled local so they have to distribute the Clarion 6 versions of the DLLs with Clarion 7. In our case, the Clarion 7 Bin path has been added to the PATH variable, either manually or by an installer (we do not know which one if it has been done by an installer). Not just that, it has been added in front of the Clarion6\bin folder in the path causing the Clarion 6 application to pick up the C60RUNX.DLL from the Clarion 7\Bin folder rather than the Clarion6\Bin folder.
After some experimenting, I found that at least for Clarion 6.3 build 9059 I could have both BIN folders in the PATH as long as the Clarion 7 one was after the Clarion 6 one. The Clarion 6 apps still run without problems and the Clarion 7 Topscan also runs correctly and without problems as far as I can tell.
So, IF you want to put the Clarion 7 BIN folder into the path statement, make sure that you do that after the Clarion 6 BIN folder. Normally you do not need to do this, but if you don't want to copy DLLs to the application folder using the PATH do access the binary files is one way to do it.
Update: It appears that if you are using Clarion 6.3 build 9056 it does not conflict with the C60RUNX.DLL file in Clarion 7.
Currently there is no direct way to set a fixed filename for any of the output targets inside the Icetips Previewer, but you can easily do this on the report itself, rather than passing the name to the previewer and do it there. In fact this would probably be the preferred method since the report probably should determine the name and location of the resulting filename.
You need to put code into a single embed where you set the filename:
All the code that you need is just a call to the SELF.SetFileName() method. Please note that each output target has it's own Setup method so if you have multiple output target templates active you will need to do this for all of them. You can pass the filename as a string, variable or an empty string if you want it to open the file dialog in the Previewer when you print to PDF.
In this case you can use:
SELF.SetFileName('')
This triggers the FileDialog to open in Previewer when you click on the PDF button.
SELF.SetFileName('myfile.pdf')
This writes the PDF file as "myfile.pdf" to the current folder.
SELF.SetFileName('C:\temp\myfile.pdf')
This writes the PDF file to specific folder, which is probably not what you want to do!
SELF.SetFileName(LOC:PDFFileName)
In this case a variable is used. You can prime the variable anywhere before the PDFReporter.SetUp method is called, or you can do it right before the SELF.SetFileName. Note that the PDFREporter.Setup method is not actually called until the report is in the Previewer so if you use a Global, Threaded variable, you can set this in the Previewer. Since the previewer and the report will always be on the same thread, you can just set this variable to be threaded and then there are not threading issues to deal with.
Here is an example of how this can be implemented. On the report I have changed the code to:
SELF.SetFileName(Glo:PDFFileName)
The global variable is a CString(2049) global variable with the "THREAD" attribute. To do that simply check the "THREAD" checkbox on the "Attributes" tab when you create the global variable - doesn't make a difference if you do it in the Global Data or in the Dictionary.
In the Previewer, all that is needed now is to set the global variable. Normally I would think that you would want to set the filename on the report, but this gives you an idea how to do it on the Previewer also. I have added an instance of our ITShellClass from the Icetips Utilities to the previewer procedure - in the "Local Data" embed I added:
ITS ITShellClass
Now in the "Local Objects | Icetips Previewer | Clarion 6 Save Buttons | Before Save Dialog"
I have added this code:
  If GQ.GName = 'PDF'
    Glo:PDFFileName = ITS.GetSpecialFolder(IT_CSIDL_PERSONAL) &|
                      '\MyPDF.pdf'
    !! Glo:PDFFileName must be be used in the report's
    !! PDFREporter.Setup.

    If Not FileDialog('Select PDF to save',|
          Glo:PDFFileName,|
          '*.pdf|*.pdf',|
          FILE:SAVE+FILE:KEEPDIR+FILE:LONGNAME+FILE:ADDEXTENSION)
      Message('No PDF File selected, aborting PDF save',|
              'PDF Saving aborted',ICON:Hand)
      Exit
    End
  End
Note the "GQ.GName = 'PDF'". This allows you to just do the PDF if you want the default filename handling for other options. The GQ contains all the target names, such as "PDF", "HTML" etc. At the top of the routine that handles the targets in the Previewer, the correct item is selected from the GQ queue so throughout the routine you can use GQ.GName to determine what is the active target being printed to.
If you find new ways to use this, I would certainly appreciate if you would be kind enough to add a comment to this article so I and others can benefit:)
Roberto Artigas has sent us the latest version of his popular DCT2SQL templates and I have made them available for download on our download page.
According to Robert this new version is compatible with Clarion 7.1. He has fixed some minor issues caused by incorrect placement of #BOXED/#ENDBOXED pairs. And the templates are backward compatible with Clarion 6.3 so you can now use those popular templates on both IDEs:)
I had the need to create an install with Setup Builder 7 that would be time limited so that it would not run after a certain date. Obviously this is no foolprof method since it can easily be bypassed by changing the date in the computer, but for what I wanted it was perfect!
Set Variable %IT_TODAY% to FUNCTION:Get System Info
(Current Date) -- Format "12"
If %IT_TODAY% Greater Than "20100228" Then
Display Message Box "This time limited Beta build
install expired on Fe..." --
"Time limited Beta install has expired"
Exit Installation(99)ElseDisplay Message Box "Note that this is a time limited
Beta build instal..." --
"Time limited Beta install"
End
Note that the lines wrap and in the actual script this is only 7 lines, which start out bold in the box above.
The first line get's the current date from the computer where the install is running in a "YYYYMMDD" format. The IF statement compares the value with "20100228" - February 28, 2010, and if the current date is greater, then it displays an error message and exits the install. If it is equal or less, then it displays a warning message about this being a time limited install and continues.
If Clarion 7.1 crashes on startup with something like:
Clarion Version : 7.1.0.6545
..NET Version         : 2.0.50727.3603
OS Version           : Microsoft Windows NT 5.1.2600 Service Pack 3
Current culture      : English (United States) (en-US)
Working Set Memory   : 38052kb
GC Heap Memory       : 1989kb

Unhandled exception terminated Clarion
Then the chances are pretty good that you do not have the Visual C++ Runtime Library update that is required. To fix this download and install this file from Microsoft: Visual C++ Runtime Library
This installs the VC2005 RTL and Clarion 7.1 will now load properly.
While exploring the Clarion 7 IDE I accidentally came across a neat way to change the font size in the editor. Hold the Control key down and scroll your mouse wheel! It will increase or decrease the font size in a nice smooth action. For old timers like myself this is a very nice way to be able to zoom in to a section of code that I need to take a really close look at!
This works in both the file editor and the embed editor in Clarion 7. You can also set the font size manually by going to "Tools | Options" and then select the "Text Editor" node in the tree on the left.
If you use the Enable Printer Selection extension on your Icetips Previewer to allow users to select a printer, then there is a bug that can cause problems. Fortunately it is very easy to fix it and it has been fixed in our sources for our next release.
The problem comes up if a user selects a page range to print from the PrinterDialog rather than selecting a page range within the previewer. This causes the FromPage and ToPage properties of the printer object to be set but there were two lines of code missing that reset those properties to default.
There are two places that you need to fix:
"Local Objects|Icetips Previewer|Print to Selected Printer|End of Routine"
and
"Local Objects|Icetips Previewer|Print current page to Selected Printer|End of Routine"
In both of those embeds, place the following code and the problem is fixed:
This has already been fixed in the next build which will be out later this week. It would be out today if it were not for a problem that we discovered before the weekend with Clarion 7. The cause of it has already been found and I'm currently working on a fix for it:)