On October 15th, 2015 the renewal prices for expired Icetips subscriptions will go up. Until then you can renew for the same price as non-expired subscriptions and save money!
If you go to http://www.icetips.com/compare.php and look at the second table from the top, "Prices for Gold & Silver Subscriptions" you see a column with "Renewal Price Expired"
Those prices do not take effect until October 15th, 2015!
On October 15th all subscriptions that have been expired more than 30 days will have to be renewed at a higher price.
Autumn (or spring, if you're in the Southern Hemisphere) brings changes in weather and landscape, and Icetips, too, has some changes this season.
MONTHLY & AUTOMATIC BILLING OPTIONS
First, weve made it easier to pay for Icetips software subscriptions by adding automatic billing options and monthly payment options.
To buy a new Gold subscription, you can now make a partial payment of $149 up front, then pay the balance in 11 monthly installments of $15. Or, you can pay for the whole thing up front, as always.
To renew a Gold subscription and have continuous access to all Icetips Software products, updates and support you can opt for a small, ongoing payment of only $15 a month. Or, if you would rather, you can still pay your renewal fee once a year. Now, though, you have the option of having your annual billing paid automatically (and get a discount!).
Solo and Silver subscriptions also have automatic annual payment options and discounts (but no monthly payment options).
Icetips introduced the Gold Subscription in 2007 and we have held prices constant since then. Unfortunately, costs have gone up – but we're still keeping our prices as low as we can.
If you opt for automatic renewals, prices will be the same as always. For those who choose to renew their subscriptions manually, prices have increased a small amount.
Some people let a little time go by before renewing their subscriptions. For those who renew their subscriptions over 30 days after the subscription has expired, renewal costs will be slightly higher.
Whether you need just a little extra help, or a whole lot of lot of help, with a new or ongoing software or SQL project, Arnor is available for contract work. $80/hour, 1 hour minimum, references available upon request. For more information about hiring Arnor, please see the Icetips Solutions website.
HAPPY 20th BIRTHDAY, ICETIPS.COM
Twenty years ago this month, Arnor Baldvinsson and Rick Beckemeyer began working together to make a website for Clarion developers. In October of 1995, Icetips.com was born. In the early days, Rick took care of the URL and hosting, while Arnor took care of the website design and content. In 2001, Arnor took over the administrative side, too. Shortly after that, Arnor's business partner and wife, Sue Pichotta, began helping with Icetips' website design and some of the content. There have been a lot of changes over the years, but through it all, Arnor and Sue have always been happy to be part of the Clarion community. We're looking forward to the years ahead. Happy Birthday, Icetips.com!
If you run into any problems with our new subscription system, please let me know! This required a lot of changes and while I have tried to make sure everything is working 100% I may have missed something! So please let me know if you see anything that doesn't look right or if prices are not showing up correctly!
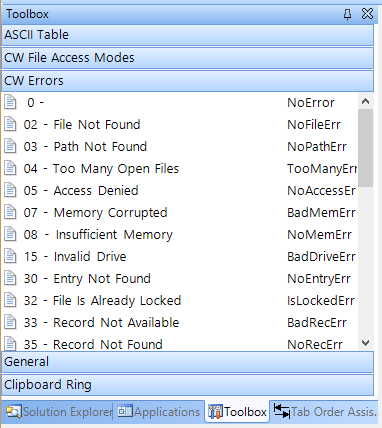
Yesterday I was messing around in the IDE and noticed the ASCII table in the Toolbox pad and realized it was missing the Extended ASCII characters (ASCII 128-255) This morning I got an email from ClarionHub, which hosts a repository on Github with some goodies - including an updated ASCII table with updates from Mark Goldberg. I played around with it and have now added all the Extended characters to the table and committed it back to Github. I have also made it available for download here on Icetips at http://www.icetips.com/files/ASCIITable.xml
Once you have saved the file, you need to go to the folder where Clarion is installed and then navigate to "data\options\TextLib" and you will find ASCIITable.xml there. Make a backup copy of it and then copy the file from Icetips over it. Restart the IDE and you should now get the full extended ASCII table.
There are two more files in the repository on Github, "CW File Access Modes.xml" and "CWErrors.xml" The first one contains all the values for file access modes and the second one contains a list of run-time errors you may encounter and what they mean - see screenshot below:
So, check those files out - they may be helpful to you:)
I will be out of the office for the next 5 days and will be back on Monday, August 31st. I'm not sure if I will have internet connection on my phone so I may not be able to receive emails or attend to support requests.
Yesterday I uploaded some changes to the Icetips website that I hope will help make the site more accessible. I'm working on a redesign that will be fully responsive, but that's going to take some time to complete.
We have changed the basic fonts so text is now more open and there is more white-space on the pages. Colors have changed as well and the site as a whole is a bit brighter. All the product pages now have tabs where there is information about features, compatibility, downloads and screenshots.
I have also added a "Version History" tab to 5 products, Utilities, Previewer, Outlookbar, Powertoolbar and Taskpanel. The version history for the rest of the products will be up there soon and I will keep this updated as new releases are made.
The login page also has tabs with the latest downloads, blog entries and your profile, so it's easy to get to it all on one page.
For those of you in the US, I wish you all a happy 4th of July tomorrow:)
The Previewer build fixes a problem with the Page of Pages template which I found out was not working with the Legacy/Clarion template chain. This build also includes the fix to scrolling under Clarion 10.
There are two new features in the Utilities that will come in very handy when dealing with importing comma separated files.
First is a new property, pDelimterStartsLine, to the SplitString method. It allows it to split strings where the delimiter is the beginning of a line, not the end of it. Normally SplitString splits strings based on CR+LF (<13,10>) characters at the end of the line. Recently a customer needed to split a string that had no CR+LF pairs, but each record started with a specific string. By implementing this change he was able to split up his file and read the data correctly.
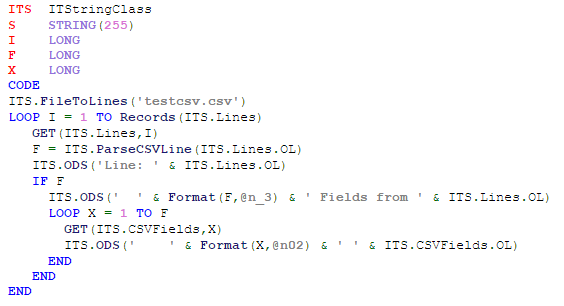
The second new thing is the ParseCSVLine method. It takes a line of comma separated CSV data and splits it into fields, stored in the CSVFields property of the Icetips String Class. This method can take regular old CSV data and parse it into easily accessible field data. It handles commas in strings without problems so there is no worry about it getting out of sync if the data is otherwise properly formatted. I have made it flexible so that you can specify if strings are quoted or not (if they are, the code will look for and ignore commas inside the string) as well as specify the delimiter to use (up to 4 characters). The pStringsAreQuotes parameter defaults to TRUE and the pDelimiter defaults to a comma (,) Check out the demo code in the help:
ITS  ITStringClass
S    STRING(255)
I    LONG
F    LONG
X    LONG
  CODE
  ITS.FileToLines('testcsv.csv')
  LOOP I = 1 TO Records(ITS.Lines)
    GET(ITS.Lines,I)
    F = ITS.ParseCSVLine(ITS.Lines.OL)
    ITS.ODS('Line: ' & ITS.Lines.OL)
    IF F
      ITS.ODS('  ' & Format(F,@n_3) & ' Fields from ' & ITS.Lines.OL)
      LOOP X = 1 TO F
        GET(ITS.CSVFields,X)
        ITS.ODS('    ' & Format(X,@n02) & ' ' & ITS.CSVFields.OL)
      END
    END
  END
ParseCSVLine example code (image)
There are also some fixes in this Utilities release:
March 10, 2015
The template could cause classes to export an older version which could cause "xxx is unresolved for export" errors when compiling exporting dlls. Fixed.
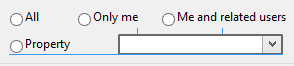
In the new IDE you can align controls using the snap lines; the thin blue lines that pop up when you drag controls around in the window designer. You see it appear in the screenshot below between the "Property" radio button and the drop down control, indicating that they are being align by the bottom edge of the controls.
Clarion 10 Snap lines and distance lines
You can also see two short lines above the drop down, which indicate optimal vertical space between the drop down control and the two radio buttons above. The distance lines appear for both horizontal and vertical spacing.
The snap lines also appear when you are re-sizing controls which can be both good and bad. It's good when you need to size multiple controls to be the same width or height, but it gets in the way if you just want to re-size a control, like for example the "Me and related users" radio button which originally extended outside of the group control, overlapping the border of the group.
You can re-size a control by holding down the shift key and then using the left/right, up/down arrow keys. But you can also re-size them by using the mouse and without the snap lines getting in the way. Simply hold down the Alt key on the keyboard and re-size or move the control with the mouse. It will now ignore the snap lines and you can re-size and re-position at will. Release the Alt key and the snap lines immediately appear and the control snaps into place.
Snap lines also work with multiple controls selected.
Clarion 10 Snap lines on multiple controls
I use the snap lines a lot when lining things up and also the distance lines to set the distance from one control to another. To the best of my knowledge they are not customizable in the IDE's Options, which would be desired so the distance can be changed.
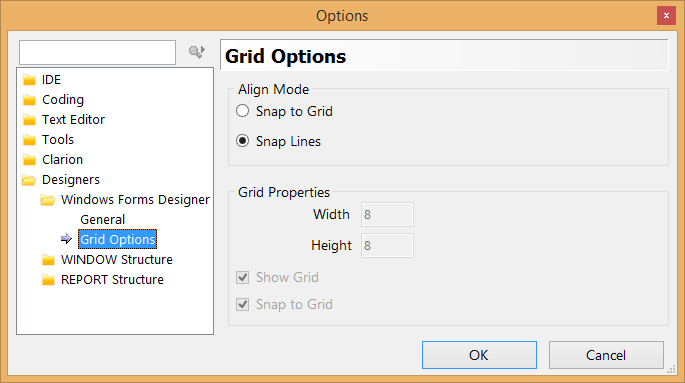
Clarion 10 Window Designer Grid Options
You also have the option to use grids. In my (limited) experience with grids in other environments, they tend to be coarse and not very helpful. But this is a matter of choice and taste so please try them out to see how they work and if you like them or not.
There is no option to turn both grids and snap lines off. Either one is always turned on. However, with the grids you can turn off the "Snap to Grid" effectively disabling it and if you uncheck "Show grid" then it will not show up either so with that you have turned both grid and snap lines off. It would have made sense to have a "None" radio button there for the Align Mode, but with the ability to select Grid and then effectively turning it off, it serves the same purpose.
Some things are just not meant to be. Switching between your local account and your MS account on Windows 8.1 should be one of them 😉
Before Sue's graduation last Saturday, she asked me to download photos from her phone and dump them into Dropbox. We use the free Dropbox account and use it a lot. But there wasn't enough room so I checked my Microsoft OneDrive and had plenty of space there. For whatever reason, the OneDrive executable will not run on my Windows 8.1 machine. It crashes File Explorer.exe and pops up a message saying so and dies. However, the Tile app worked and loaded. But it requires you to log in to your computer using your Microsoft account. So it politely offered to do so and I - stupidly - followed.
I got the photos uploaded, no problems. But then I noticed I had a problem in Thunderbird which I use to read my email and newsgroups. Every time it tried to connect to the Inbox on my Hostgator IMAP email account it would pop up this message:
Thunderbird error message
"Server Hostgator has disconnected. The server may have gone down or there may be a network problem."
So for a while I thought there was some problem with the email server, but this persisted. I sometimes have a problem with my router, so it got rebooted several times - didn't help at all. I had no problem accessing the account using Microsoft Outlook so I knew this wasn't a problem on the server, this was something in Thunderbird. Lot of research and no real results.
After snooping around in the Thunderbird profile folder I realized that when I switched the accounts from my local account to the MS account, Thunderbird created all new profile, copying the existing data into new folders with a "-1" attached to them. So I switched back to the local account and thought OK, this was easy. Any guesses on how that worked? You're right, it didn't help at all! Message was still there.
So I decided to take drastic measures and completely uninstalled Thunderbird. Cleaned out everything, renamed the profile folder, cleaned out the Program Files folder and the registry. Installed the latest version and it happily found the server, loaded everything nice and neat. Only thing now was to copy over the filters and I was good to go. Or so I thought. Copied the msgFilterRules.dat file into the instance sub folder under ImapMail and life was good. NO, the darn message was back and it stopped working!
Now I knew this had something to do with the filters, so I removed them, restarted Thunderbird and it was happy as a clam. No ifs about it! The filters file is a text file, but not easily digested and I looked and looked for a rouge filter that was referencing folders that weren't there or some such problem. Didn't see any, so I painstakingly entered every single one of the filters back in. Doing so I found two filters that had an invalid path to copy to.
This message is very misleading as it has nothing to do with the server being down. What happens is that a filter tries to copy an email to an invalid folder location and it fails.
Thunderbird wasn't the only program that tied itself into a knot. Snagit locked up every time I tried to use it too after I switched to the MS account. Once I switched back to my local account it was back to its old happy self, but it had lost the hotkey settings.
Bottom line is: IF you need to switch accounts, make SURE that you can recover! I was lucky since this is an IMAP account, all the emails are on the server, so it was relatively easy for me to just clean out the program and start over.
The right to vote is something we expect and hardly think about, but it hasn't always been that way.
One hundred years ago, on June 19, 1915 women in Iceland gained the right to vote after years of campaign. 4 years later Congress passed the 19th amendment to the United States Constitution guaranteeing American women the same rights. In Iceland farm workers also got the right to vote at the same time. At the time they were close to 40% of the male population above voting age. This was similar to changes that happened in the early to late nineteenth century in the US, where first property ownership requirements were eliminated, allowing African Americans to vote and Native Americans in 1890. Women in Finland were the first European women to get the right to vote, in 1907, but Switzerland the last, not until 1971!
My mom was a staunch advocate for women rights all her life. She grew up in a place called Hælavík, in the far North West fjords of Iceland, a remote area that saw the population disappear soon after World War II. You can view this area in Google Maps Click on the "Show imagery" in the lower right corner of Google Maps and you can view photos from Hælavík.
Hælavík, a remote place in North West Iceland - Linked from https://jakobinasigurdardottir.wordpress.comMy mom, Sigurborg Rakel Sigurðardóttir, born August 29, 1919, died on March 24, 2005. Photo taken sometime around 1965 (unknown)
She worked hard all her life, as a maid, cleaning lady at the US Navy base in Iceland and for the last 40 years of her life she was a farmers wife, which wasn't always easy! She also worked in the local fish processing plant, slaughter house and herring salting stations for years. She raked hay, delivered lambs and nursed them to life on cold days, rounded up sheep and milked cows. She took pride in a clean and neat house which was not easy on a farm! She cooked two hot meals every day, baked cakes and bread and made jam and berry juice. Until 1973 she took care of making cream and butter and she always had chicken for fresh eggs.
Laila and I on our farm in Iceland back in 2002. My mom knitted the sweater I'm wearing.
She knitted socks, mittens and sweaters, sewed and patched clothes when needed.
Every summer for 25 years, from 1960 to 1985 she took in kids from her brothers, sisters or family friends. They would stay the summer and help on the farm. Usually two, sometimes three. It was often tight in the small farmhouse, which was only about 700 sq.ft. but there was always room for one more! We didn't get electricity on the farm until 1971 and it must have been a lot of work to wash laundry and take care of all those people. My grandmother lived with us too until she died in 1970. I never, ever, heard my mom complain about that there were too many people around - perhaps the contrary as she was very social.
In January 1979 she fell on snow covered ice when coming back from feeding her chicken and broke her right wrist. It wasn't put together properly and it bothered her ever since. She slowed down knitting after that as it hurt her hand pretty badly.
In March 1997 she was taken ill and probably had a stroke or something like that (it was never determined) In two weeks she went from being a little forgetful to full onset dementia. From 1999 she and my dad lived in assisted living and later in a nursing home, where she died in 2005. My dad passed away in 2003. The dementia had progress so that the last time I visited in 2004 she didn't show any signs of recognizing me. She was 85 when she passed away. I felt it was appropriate to remember my mom on this day that meant so much for women of her generation 🙂
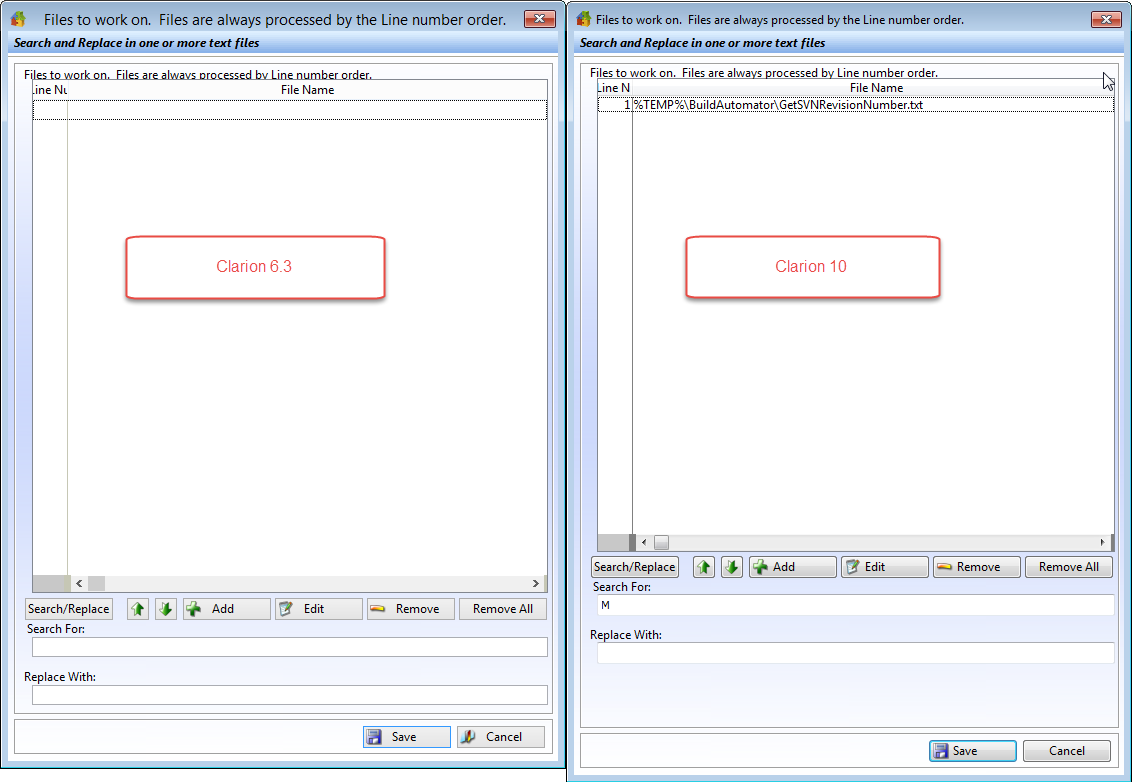
I have been working on Build Automator in Clarion 10 this week, along with other things. Yesterday I discovered that there was something very odd going on with the resizing of the windows. When comparing the Search and Replace window between the Clarion 6.3 version and the Clarion 10 version, it was like the listbox wasn't stretching like it should, as seen in the screenshot below.
Clarion 6.3 window on the left, Clarion 10 window on the right.
After quite a bit of snooping around and posting on the newsgroup, where Bob Campbell pointed out the listbox size issue, I came to the conclusion that there was a problem with the WindowResizeClass.SetParentDefault method in ABRESIZE.CLW. So to test it, I copied the one from Clarion 6.3 and omitted the original and lo and behold the resizing worked perfectly again!
After sleeping on it, I realized that the code change involved a new method of finding the parent control of a control, which doesn't have a PROP:Parent parent - kind of an orphan;)
In the class method the code figures out what type of parent controls there can be:
 CASE ThisControl{PROP:Type} + 0
 OF CREATE:Group
 OROF CREATE:Option
 OROF CREATE:Tab
 OROF CREATE:Sheet
This is missing both CREATE:Panel and CREATE:Region! I'm using Panels all over the place on the windows in Build Automator and came to the conclusion that this is where the problem was. So I added:
 OROF CREATE:Panel
 OROF CREATE:Region
to the list, re-compiled after omitting the Clarion 6.3 code, and it worked perfectly again:) The CASE statement is around line 580 in the ABRESIZE.CLW file if you want to do this fix to your class file. I have reported this to Softvelocity and hope they will fix this in the next release.