Today I ran into a problem with a process on a SQL table. It was using a range limit and filters so it was only processing a subset of the data. However, the progress bar of course was stuck with the entire data set so it would go up to about 2% and be done. I have a procedure that I can pass some parameters to count the records in a table for a given filter so I knew exactly how many records the process was going to process. But I got stuck on how to reset the high limit for the progress bar. After some snooping around I found a property that I could set and everything worked like a charm.

 !! First get the number of records.  
 !! SQ is a global equate:     SQ Equate('<39>')

 Loc:Recs = CountSQLRecords(Name(MyFile),|
            'Parent_ID = ' & SQ & Loc:Parent_ID & SQ)
 ThisProcess.RecordsToProcess = Loc:Recs

Put this code into priority 8550 or higher in the ThisWindow.Init method in the process procedure and the progress bar will now go smoothly from 0% to 100%

If someone has a method to call for this, please comment on this post. I could not find any method that worked, compiled and ran! Setting the RecordsToProcess property seems to have no bad effects.

Arnor Baldvinsson

I got an email this morning from a customer who was trying, without any success, to change the text of items in a Drop Combo control in PowerToolbar at runtime. The simplest way would be to simply use:

Toolbar1.SetItemText(MyItem,'My Text')

Unfortunately that only works for drop buttons, not Drop Combos. I figured it would be a simple task to add a method to do this but ran into a brick wall. The brick wall was the APIs used to construct Drop down Combo controls do not have any messages or methods to change the text for a given item! It seems to be set in stone once the item is created. So what can you do? The simple answer is to recreate the Drop Combo items! It is very fast and as far as I can tell it does not cause any flicker.

If you want to restore the text in the entry field, you need a single CSTRING variable to contain the text. Below is the code needed to reset the items in the Drop Combo:

Loc:Str = Toolbar1.GetText(ID1_DropCombo)
Toolbar1.DeleteItems(ID1_DropCombo)
Toolbar1.AddComboItem(ID1_DropCombo, 'NEW Drop combo item 1', )
Toolbar1.AddComboItem(ID1_DropCombo, 'NEW Drop combo item 2', )
Toolbar1.SetText(ID1_DropCombo,Loc:Str)

In this case Loc:Str is a CSTRING(100) variable that is a temporary buffer for the contents of the Drop Combo edit control. The Toolbar1.DeleteItems deletes ALL the items from the list and the next two Toolbar1.AddComboItem lines add two new items to the list. The Toolbar1.SetText resets the text in the edit control and you are back where you started except you now have updated items in your list.

Arnor Baldvinsson

A customer contacted me and sent me some screenshots of a menu themed with PowerToolbar that had several menu items missing from the last menu on the menubar. It was obvious that something was not working correctly so I asked him to export the appframe to TXA and email it to me. After duplicating this problem yesterday I spent couple of hours today investigating what was going on. Here is a screenshot of the menu:

Missing menu items

Something was obviously wrong and my initial investigation wasn't promising. The API calls that get the information about each menu item simply weren't returning the text for the menu items! My suspicion was directed to a big menu with several levels of submenus as a possible culprit because it was the menu next before the trouble menu. So I cut it out of the source and lo and behold the Help menu worked again! I painstakingly copied the items and menus back into the menu until the Help menu failed and I had found the culprit.

One of the MENU statement had the HIDE attribute on it, and something about that set the menu item organization completely off and plunged the next menu into a deep hole! The fix was very simple, just remove the HIDE attribute from the MENU and add a one line of code into ThisWindow.Init to hide the menu.

 ?ReportsAddressBook2 {PROP:Hide} = TRUE

That's all there was to fix this problem. The menu now looks like it should:

Missing menu items fixed

This customer had also noticed another problem which was that the hotkey text on a menu item would disappear if the menu had a submenu and the submenu had been displayed. After some digging around I also found the culprit for that problem. When the submenu opened and closed the hotkeys for the items in the parent menu weren't reloaded so the width of each item was set to 0. This caused the hotkey text to be effectively drawn to the right of the menu. This is now fixed in build 2.0.118 which will be made available to the public after the weekend:)

Arnor Baldvinsson

5

One of the features of Clarion 7 is code completion, also called intellisense. Unfortunately it does not work in the embed editor but it does in the source editor and the Embeditor. The Embeditor is what you get when you right click on a procedure and select "Source" from the popup menu or open the Embed tree and click the Source button.

In one of the recent builds, Softvelocity gave us an option to open the Embeditor when we double click on an embed in the embed tree and thus give us full use of the intellisense.

It is easy to set this up once you know where to look! Which is why I'm writing this as I have to hunt this down every time I do a clean install of C7.

But before we go further, I want to clear up something that causes a lot of confusion.

In Clarion there are 3 editors:
Source editor: This is what you get when you open a source file for editing. This editor works like any other editor and edits files only.

Embed Editor: This is the editor that you get when you go into an embed via the embed tree. This editor only displays one embed and does not have code completion.

Embeditor: This is the editor that you see when you right click on a procedure and select "Source" or hit the "Source" button in the embed tree. This editor shows all embeds and does have code completion.

There are three places that affect the code completion. To set it up, please follow these steps.

1. Open the Tools menu and select "Application Options" Note that this option is disabled if an application is loaded.
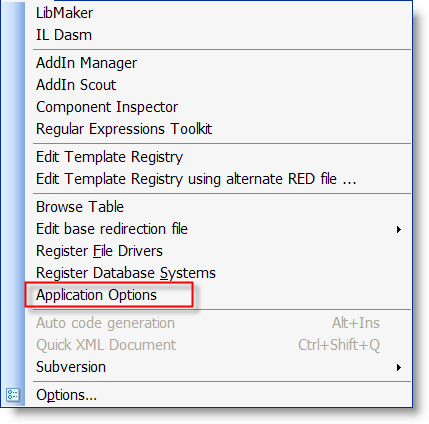
Clarion 7 Tools Menu

2. Go to the "Embed Editor" tab and make sure that the "Edit source embeds in context by default (Using Embeditor)" is checked.
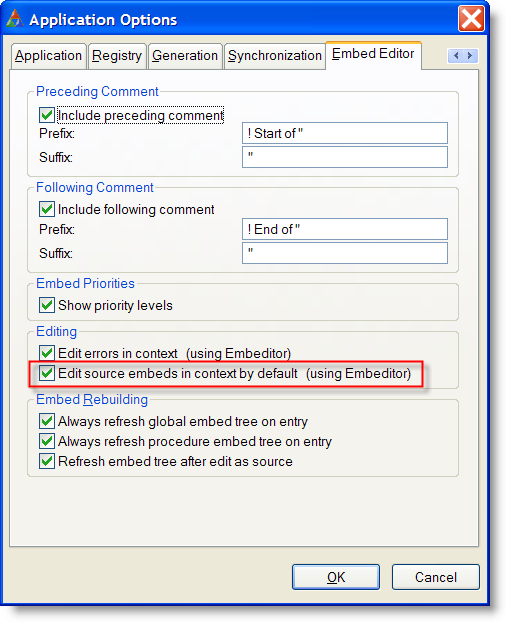
Clarion 7 Embed Editor Options

This allows you to use the Embeditor instead of the Embed Editor when you open an embed from the embed tree, giving you full access to the code completion.

3. Open the Tools menu and select the "Options" item which is at the bottom of the menu.

4. Select the "Text Editor | Code Completion" node in the tree on the left and check the options you want active. I believe that the settings I have are the default settings.
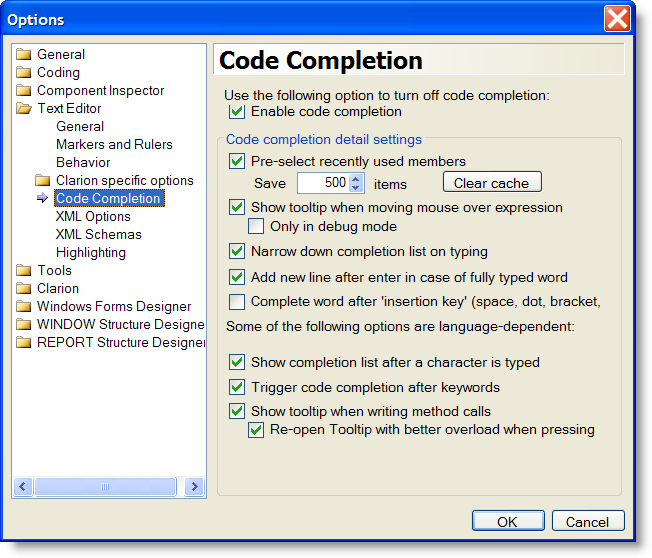
Clarion 7 Code Completion Options

5. Finally make sure that Code Completion is active in the Edit menu.
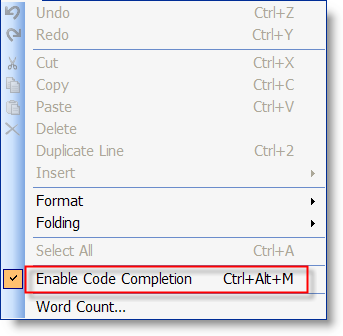
Clarion 7 Code Completion setting

Now when you double click on an embed entry in the embed tree, you will be taken directly into the Embeditor where you can edit your embed in context and get full use of the code completion/intellisense feature!
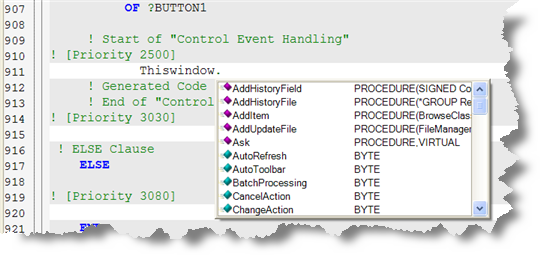
Clarion 7 Code Completion in the Embeditor

I hope this helps some people who are lost in where exactly to set this up.

Arnor Baldvinsson

One of my customers contacted me couple of days ago to ask if it was possible to sort items in a drop button, when the items are created at runtime. Since the items are stored in a queue I figured it would be fairly easy.

 Toolbar1.DeleteItems(ID1_Name)

 Toolbar1.AddDropItem(ID1_Name,'Arnor','ok_16.ico',1)
 Toolbar1.AddDropItem(ID1_Name,'Robert','ok_16.ico',2)
 Toolbar1.AddDropItem(ID1_Name,'Monica','ok_16.ico',3)
 Toolbar1.AddDropItem(ID1_Name,'Ana Maria','ok_16.ico',4)
 Toolbar1.AddDropItem(ID1_Name,'Ivan','ok_16.ico',5)

 Sort(Toolbar1.BandQ.ControlQ.pDropButton.ItemQ,|
      Toolbar1.BandQ.ControlQ.pDropButton.ItemQ.szTxt)
 !! Reset the ItemIDs after sorting the queue.
 Loop I# = 1 To Records(Toolbar1.BandQ.ControlQ.pDropButton.ItemQ)
   Get(Toolbar1.BandQ.ControlQ.pDropButton.ItemQ,I#)
   Toolbar1.BandQ.ControlQ.pDropButton.ItemQ.ItemID = I#
   Put(Toolbar1.BandQ.ControlQ.pDropButton.ItemQ)
 End
 Display()

Note that this will not work properly if you have separators in the drop items. If you want to do that, I would suggest to add the item text entries to a queue and sort them before you add them to the drop button. Something like this might work:

AddDropButtonItems         ROUTINE
 Data
Q   Queue
T     CString(256) !! Item text
SF    Byte         !! Separator Follows
    End
 Code
 Q.T = 'Arnor' ;     Q.SF = False; Add(Q)
 Q.T = 'Robert' ;    Q.SF = True;  Add(Q)
 Q.T = 'Monica' ;    Q.SF = False; Add(Q)
 Q.T = 'Ana Maria' ; Q.SF = False; Add(Q)
 Q.T = 'Ivan' ;      Q.SF = False; Add(Q)
 Sort(Q,Q.T)
 Toolbar1.DeleteItems(ID1_Name)
 Loop X# = 1 To Records(Q)
   Get(Q,X#)
   Toolbar1.AddDropItem(ID1_Name,Q.T,'ok_16.ico',1)
   If Q.SF = True !! Add Separator
     Toolbar1.AddDropItem(ID1_Name,'-','ok_16.ico',1)
   End
 End

 Display()

This should be able to handle sorted list with separators. I'm planning to add a method to sort the items alphabetically and I think I can make it handle the separators correctly too. The method I describe here is a bit more flexible as it gives you full control over how the items are arranged.

Arnor Baldvinsson

One of my customer asked how he could hide and unhide a band on a PowerToolbar on the application frame from a PowerToolbar button on his MDI window.

In order to do this you need to set up the MDI client template on the MDI window. PowerToolbar uses a global instance of the POToolbarGlobalClass to control the appframe toolbar from other threads. You can take a look at some of the methods in the online documentation.

The code you need to toggle the visibility of a band looks like this:

If AppToolbar.GetBandVisible(TB1_TestWindowBand) = True
    AppToolbar.SetBandVisible(TB1_TestWindowBand, False)
Else
    AppToolbar.SetBandVisible(TB1_TestWindowBand, True)
End

That is pretty much all there is to it. This is exactly the same code as you would use on the appframe itself.

Arnor Baldvinsson

You may find that you need to dynamically change the text in a header or item. This is a bit tricky in the currently public release, but is made much simpler in the next release.

In the current release, 2.0.111, you need to add a few lines of code to make this work. First of all you need to declare a group in your procedure data embed:

TskI GROUP(POB:TaskInfo)
     End

This declares a group that you then need modify.

 TskI = Outlookbar1.GetTaskInfo(OutlookBar1.Outlookpanel,0)
 TskI.Title = 'Changed Outlookbar Title'
 Outlookbar1.SetTaskInfo(OutlookBar1.Outlookpanel,|
                         0,|
                         TskI)

The first line loads the local group, TaskInfo, with the data from the header or item. The second line sets the title in the group and the third line updates the the header or item. Since this is rather awkward we decided to simplify this down to:

OutlookBar1.SetTitle(OutlookBar1.Outlookpanel,|
                     0,|
                     'Changed Outlookbar Title')

To download version 2.0.112, which includes the new SetTitle method, please go to Download Icetips Outlookbar 2.0.112

Arnor Baldvinsson

Sometimes it is necessary to update and refresh controls on the toolbar. In order to do so you need to know the control IDs. You can find those in the templates (see the "ID" field in these screenshots) or you can open the source for the procedure in the embeditor (right click on procedure and select "Source" from the popup menu) and locate declaration of the toolbar class (search for "POToolbarClass"). The IDs will be declared rigth above it and the control IDs start in a number range of 10,000.

Here is an example on how to update couple of entry fields and a checkbox button:

 loc:query     = SEA:Terms
 MinAsk        = SEA:MinAsk
 MaxAsk        = SEA:MaxAsk
 Toolbar30.SetText    (ID30_SearchEntry, loc:Query)
 Toolbar30.SetText    (ID30_MnPrice,     MinAsk)
 Toolbar30.SetText    (ID30_MxPrice,     MaxAsk)
 Toolbar30.SetChecked (ID30_Haspic,      Sea:HasImage)
 Toolbar30.Refresh(True)

Note that in order to make sure that everything is updated correctly you need to use Refresh(True) rather than just Refresh()

Arnor Baldvinsson

How can you execute an action in XP Taskpanel in code?

This is actually very simple to do, but may not be obvious. The following code was tested in the XPTaskpanelDemo_C6.app in the OpenWindow event handler in the ToolboxMenu procedure:

TaskPanel1.ExecuteAction(TaskPanel1.Demos, |
                         TaskPanel1.Demos:Colors, |
                         MouseLeft, 0)

This opens the Color Demo window when the taskpanel window opens.

Arnor Baldvinsson